Create your own Oauth Server with Node js

Creating a Web application❓
🔷You need a login flow.
Creating a Mobile application❓
🔷You need a login flow.
Creating an AI Chatbot❓
🔷You need a login flow.
And of course, you would need single sign on.
Sometimes, its pretty hard to wrap your head around the Oauth Login flow for apps. More often than not you would use federated login flows from Google or Facebook. Maybe even a third party provider like Auth0.
This federated login allows you to implement Single Sign on across your apps.
But does any of it make any sense? What if someone were to ask you to create your own authentication server. Where would you even start?
Well, that’s where I come in. I am going to make things easy for you. Let me explain
The Traditional Oauth Authentication flow
1. User Requests Authorization
- User Initiates Login: The user clicks a login button on the client application, indicating they want to authenticate.
- Client Redirects to Authorization Server: The client redirects the user to the OAuth authorization server’s authorization endpoint with the necessary parameters such as client ID, redirect URI, response type (typically code), and scopes.
2. User Grants Authorization
- Authorization Server Presents Login/Consent: The authorization server prompts the user to log in and then asks the user to consent to the requested scopes.
- User Grants Consent: The user authenticates (if not already authenticated) and consents to the scopes requested by the client application.
3. Authorization Server Redirects Back to Client
- Authorization Code: If the user grants consent, the authorization server redirects the user back to the client’s redirect URI with an authorization code.
4. Client Requests Access Token
- Client Sends Authorization Code: The client application sends a request to the authorization server’s token endpoint, including the authorization code received, client ID, client secret, and redirect URI.
- Authorization Server Validates and Issues Token: The authorization server validates the authorization code, client credentials, and redirect URI, then issues an access token (and optionally a refresh token) back to the client.
5. Client Accesses Protected Resources
- Client Makes Authenticated Request: The client uses the access token to make requests to the resource server to access protected resources.
- Resource Server Validates Token: The resource server validates the access token with the auth server using middleware, and if valid, provides the requested resources to the client.
This is the standard flow when authenticating with Google, Facebook, etc. How would you like to create your own Oauth Server?
Let’s do it. Let’s create one!
Creating an Oauth Server
I must confess. I love Node js. It is do damn easy to set things up with Node js. If you don’t know how to use Node js yet, I highly recommend learning about it.
Prerequisites
- Node version v16+
- npm version v8+
- npx version v8+
- react js (for building the login form)
Building the Auth Server
We will be using the node js oauth2-server to implement our Auth server.
First, lets initialize our app. Run the following commands in your project folder
npm init -y
npm install express oauth2-server body-parser
This will create the package.json file. This is what my dependencies look like ->
"dependencies": {
    "body-parser": "^1.20.2",
    "express": "^4.19.2",
    "oauth2-server": "^3.1.1"
  }
Next, we code our Authentication logic in the main server.js file. This is what it looks like ->
//using express
const express = require('express');
const bodyParser = require('body-parser');
const OAuth2Server = require('oauth2-server');

const app = express();
app.use(bodyParser.urlencoded({ extended: true }));
app.use(bodyParser.json());

const Request = OAuth2Server.Request;
const Response = OAuth2Server.Response;

//initialize the oauth server with a model representing the user principle
//the model servers as the entity to query users from databases or LDAP or Active Directory
app.oauth = new OAuth2Server({
    model: require('./model'),
    allowBearerTokensInQueryString: true
});

//function to generate the access token bases on the Oauth2Server request
app.post('/oauth/token', (req, res, next) => {
    const requ = new Request(req);
    const resp = new Response(res);

    //generate the token
    app.oauth
        .token(requ, resp)
        .then(token => {
            res.json(token);
        })
        .catch(err => {
            res.status(err.code || 500).json(err);
        });
});

//middleware to intercept requests to secure and ensure they are authenticated
app.use('/secure', (req, res, next) => {
    const request = new Request(req);
    const response = new Response(res);

    //authenticate the request based on the token within the request
    app.oauth
        .authenticate(request, response)
        .then((token) => {
            next();
        })
        .catch((err) => {
            res.status(err.code || 500).json(err);
        });
});

//function can only be invoked for an authenticated request
app.get('/secure', (req, res) => {
    res.send('Secure data');
});

app.listen(3000, () => {
    console.log('Server is running on port 3000');
});
'/oauth/token' -> The app.oauth.token method is called with the wrapped request
and response objects. This method generates an OAuth2 token.
'/secure' -> This middleware is applied to all routes starting with /secure
and ensures only authenticated requests are forwared to the /secure functionThis what our model looks like. It is hardcoded as of now for demonstratability but ideally you would be confirming this information with an LDAP source ->
const crypto = require('crypto');
const model = {};

const clients = [
    {
        clientId: 'client-id',
        clientSecret: 'client-secret',
        grants: ['password', 'refresh_token'],
    },
];

const tokens = [];
const users = [
    {
        id: '1',
        username: 'user',
        password: 'password',
    },
];

model.getClient = (clientId, clientSecret) => {
    return clients.find(client => client.clientId === clientId && client.clientSecret === clientSecret);
};

model.saveToken = (token, client, user) => {
    token.client = client;
    token.user = user;
    tokens.push(token);
    return token;
};

model.getAccessToken = (accessToken) => {
    return tokens.find(token => token.accessToken === accessToken);
};

model.getRefreshToken = refreshToken => {
    return tokens.find(token => token.refreshToken === refreshToken);
};

model.revokeToken = token => {
    const index = tokens.findIndex(t => t.refreshToken === token.refreshToken);
    if (index !== -1) {
        tokens.splice(index, 1);
        return true;
    }
    return false;
};

model.getUser = (username, password) => {
    return users.find(user => user.username === username && user.password === password);
};

model.verifyScope = (token, scope) => {
    return true; // Simplified for this example
};

module.exports = model;
Disclaimer: Please don’t use this code as is. Security hardening would be required
Now that our server is ready, we can run it using the command
node server.jsThe server will start on port 3000. You can change the port to another as well if you like.
Next, we will design a basic login form in React js.
The Client
We will use React js to implement a basic login form which will redirect to another page on succesful authentication.
Let’s create the app using npx.
Please install npx using this guide — https://www.npmjs.com/package/npx
npx create-react-app react-client
npm install axios
This will create the react app skeleton. We will be using axios to make HTTP requests.
These are the dependencies from package.json ->
"dependencies": {
    "@testing-library/jest-dom": "^5.17.0",
    "@testing-library/react": "^13.4.0",
    "@testing-library/user-event": "^13.5.0",
    "axios": "^1.7.2",
    "react": "^18.3.1",
    "react-dom": "^18.3.1",
    "react-router-dom": "^5.2.0",
    "react-scripts": "5.0.1",
    "web-vitals": "^2.1.4"
  }
Next, lets create routes to the Login page and Authenticated page within the parent (root) component ->
import React from 'react';
import { BrowserRouter as Router, Route, Switch } from 'react-router-dom';
import Login from './Login';
import Secure from './Secure';

const App = () => {
    return (
        <Router>
            <div>
                <Switch>
                    <Route exact path="/" component={Login} />
                    <Route path="/secure" component={Secure} />
                </Switch>
            </div>
        </Router>
    );
};

export default App;
Using the Router module, we have configured 2 routes to Login form and the Secure, authenticate page.
Now, lets complete the client Authentication service which will submit the user id and password to our auth server and get back the access token.
import axios from 'axios';

const API_URL = 'http://localhost:3000';

class AuthService {
    login(username, password) {
        const params = new URLSearchParams();
        params.append('grant_type', 'password');
        params.append('client_id', 'client-id');
        params.append('client_secret', 'client-secret');
        params.append('username', username);
        params.append('password', password);

        return axios.post(API_URL + '/oauth/token', params, {
        headers: {
            'Content-Type': 'application/x-www-form-urlencoded'
        }
        })
        .then(response => {
            if (response.data.access_token) {
                //set the token in local storage to include in subsequent
                //requests
                localStorage.setItem('user', JSON.stringify(response.data));
            }
            return response.data;
        });
    }

    logout() {
        localStorage.removeItem('user');
    }

    getCurrentUser() {
        return JSON.parse(localStorage.getItem('user'));
    }
}

export default new AuthService();
Please use dot env to get urls and other config. Hard Coding is not a good practice and I don’t promote or recommend it.
Next, let’s create the Login form. That’s a bit more straightforward
import React, { useState } from 'react';
import AuthService from './AuthService';
import { useHistory } from 'react-router-dom';
const Login = () => {
const [username, setUsername] = useState('');
const [password, setPassword] = useState('');
const history = useHistory();
const handleLogin = async (e) => {
e.preventDefault();
try {
const response = await AuthService.login(username, password);
console.log('Login successful', response);
// Redirect to the secure page on successful authentication
history.push('/secure');
} catch (error) {
console.error('Login failed', error);
}
};
return (
<div>
<h2>Login</h2>
<form onSubmit={handleLogin}>
<div>
<label>Username</label>
<input
type="text"
value={username}
onChange={(e) => setUsername(e.target.value)}
/>
</div>
<div>
<label>Password</label>
<input
type="password"
value={password}
onChange={(e) => setPassword(e.target.value)}
/>
</div>
<button type="submit">Login</button>
</form>
</div>
);
};
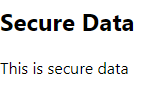
export default Login;And finally, the Secure page that will display data from our backend if the request was authenticated ->
import React, { useState, useEffect } from 'react';
import AuthService from './AuthService';
import axios from 'axios';

const Secure = () => {
    const [secureData, setSecureData] = useState('');

    useEffect(() => {
        const fetchData = async () => {
            const user = AuthService.getCurrentUser();
            if (user) {
                try {
                    const response = await axios.get('http://localhost:4000/secure-data', {
                        headers: {
                            'Authorization': 'Bearer ' + user.access_token
                        }
                    });
                    setSecureData(response.data.data);
                } catch (error) {
                    console.error('Failed to fetch secure data', error);
                }
            }
        };
        fetchData();
    }, []);

    return (
        <div>
            <h2>Secure Data</h2>
            {secureData ? <p>{secureData}</p> : <p>This is secure data</p>}
        </div>
    );
};

export default Secure;
And that’s it. That completes our client. Run the client with
npm startThe Backend Service
The backend service would only serve data to authenticated clients. This is where it is important to understand the flow. This is what the Authentication flow looks like —
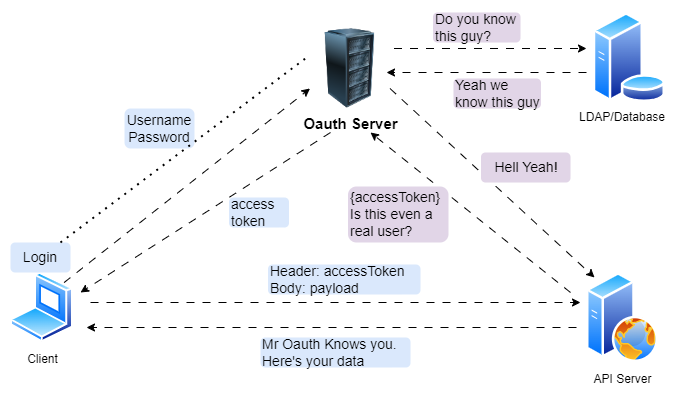
- User accesses the React client and enters login credentials.
- The React client sends the login credentials to the Auth server to obtain a token.
- The Auth server verifies the credentials and returns an access token to the React client.
- The React client stores the access token.
- The user attempts to access a secure endpoint in the React client.
- The React client sends a request with the access token to the Node.js backend.
- The Node.js backend forwards the request with the access token to the Auth server for verification.
- The Auth server verifies the token and responds to the Node.js backend.
- The Node.js backend responds to the React client with the secure data.
- The React client displays the secure data to the user.
This is the basic flow for our login flow but with security controls and hardening it does not remain as simplistic as this demonstration.
Right, so what’s up with our backend server? Let’s initialize another node js app like we did previously.
npm init -y
npm install express body-parser axios
This app will have only one server.js file to serve data from a secure and authenticated endpoint.
Here’s the code ->
const express = require('express');
const bodyParser = require('body-parser');
const axios = require('axios');

const app = express();
app.use(bodyParser.urlencoded({ extended: true }));
app.use(bodyParser.json());

//check with the auth server
//this has to be the authenticated token
//it cannot be expired, the server should have generated it
app.post('/verify-token', async (req, res) => {
    const token = req.body.token;
    try {
        const response = await axios.post('http://localhost:3000/oauth/token', {
            token: token,
        });
        res.json(response.data);
    } catch (error) {
        res.status(401).json({ error: 'Invalid token' });
    }
});

//allow access to secure data only for authenticated requests
app.get('/secure-data', async (req, res) => {
    const token = req.headers['authorization'].split(' ')[1];
    try {
        const response = await axios.post('http://localhost:3000/oauth/token', {
            token: token,
        });
        res.json({ data: 'This is secure data' });
    } catch (error) {
        res.status(401).json({ error: 'Invalid token' });
    }
});

app.listen(4000, () => {
    console.log('Backend server is running on port 4000');
});
And that’s it. This is what it looks like in action ->
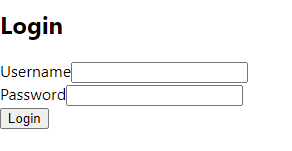
Enter the hard coded user id and password which is — ‘user’ and ‘password’
Worst password ever, I know
Click login and you see
and in the console
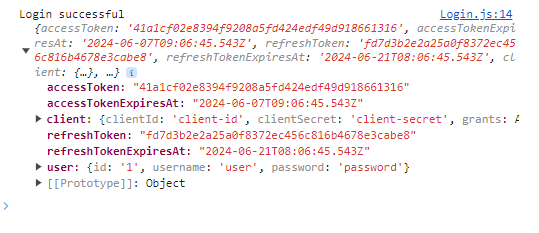
Ez Pz.. isn’t it?
Follow me Ritesh Shergill
for more articles on
👨💻 Tech
👩🎓 Career advice
📲 User Experience
🏆 Leadership
I also do
✅ Career Guidance counselling — https://topmate.io/ritesh_shergill/149890
✅ Mentor Startups as a Fractional CTO — https://topmate.io/ritesh_shergill/193786